¶ My Missions
¶ As a Tester
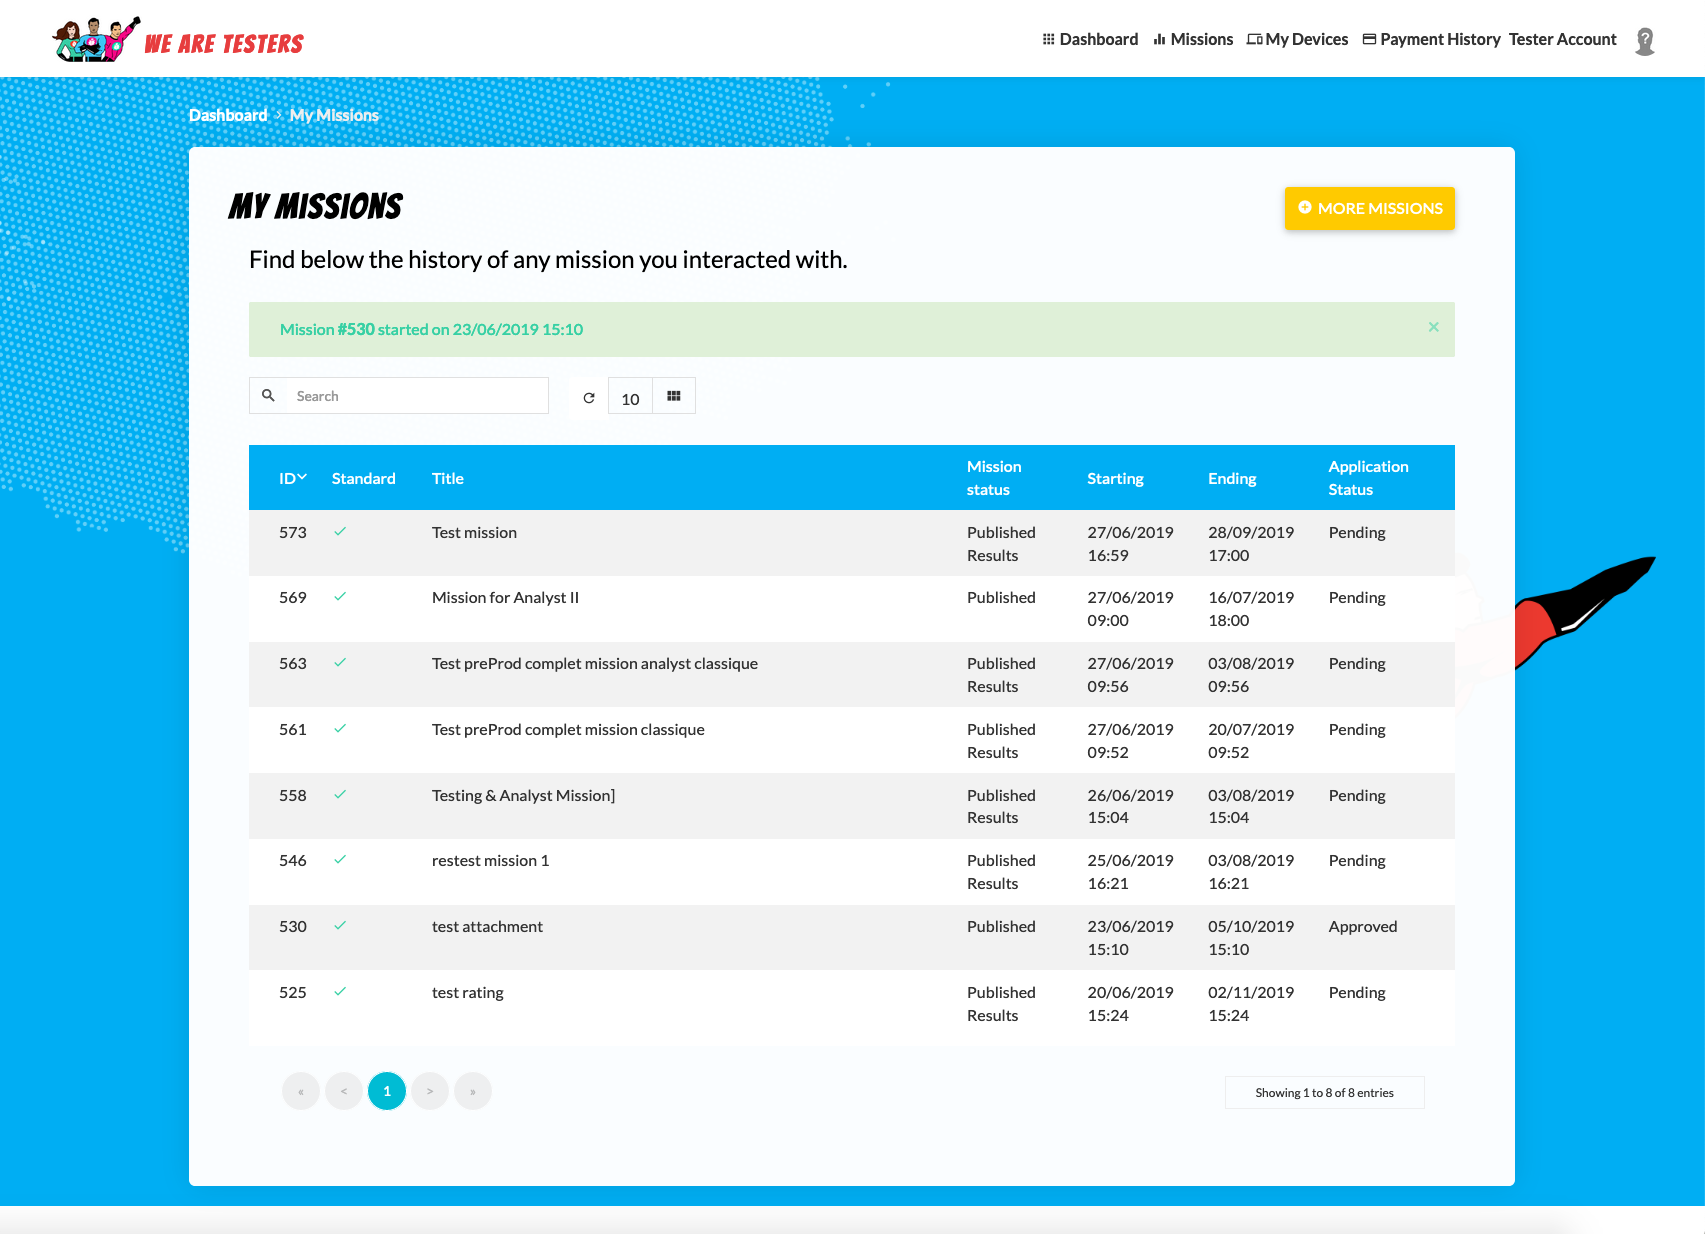
On the My Missions page, you will find a table listing all of the missions that you have applied to.
You can use the search window to find a specific mission.
You can use the table tools to decrease/increase the number of rows, and show/hide columns.
Click on a mission to see its details. ( Mission Details)
The button MORE MISSIONS redirects you to the the “Other Missions” page allowing you to see the current missions that you can apply to. ( Other Missions - All Missions)
¶ Other Missions
¶ As a Tester
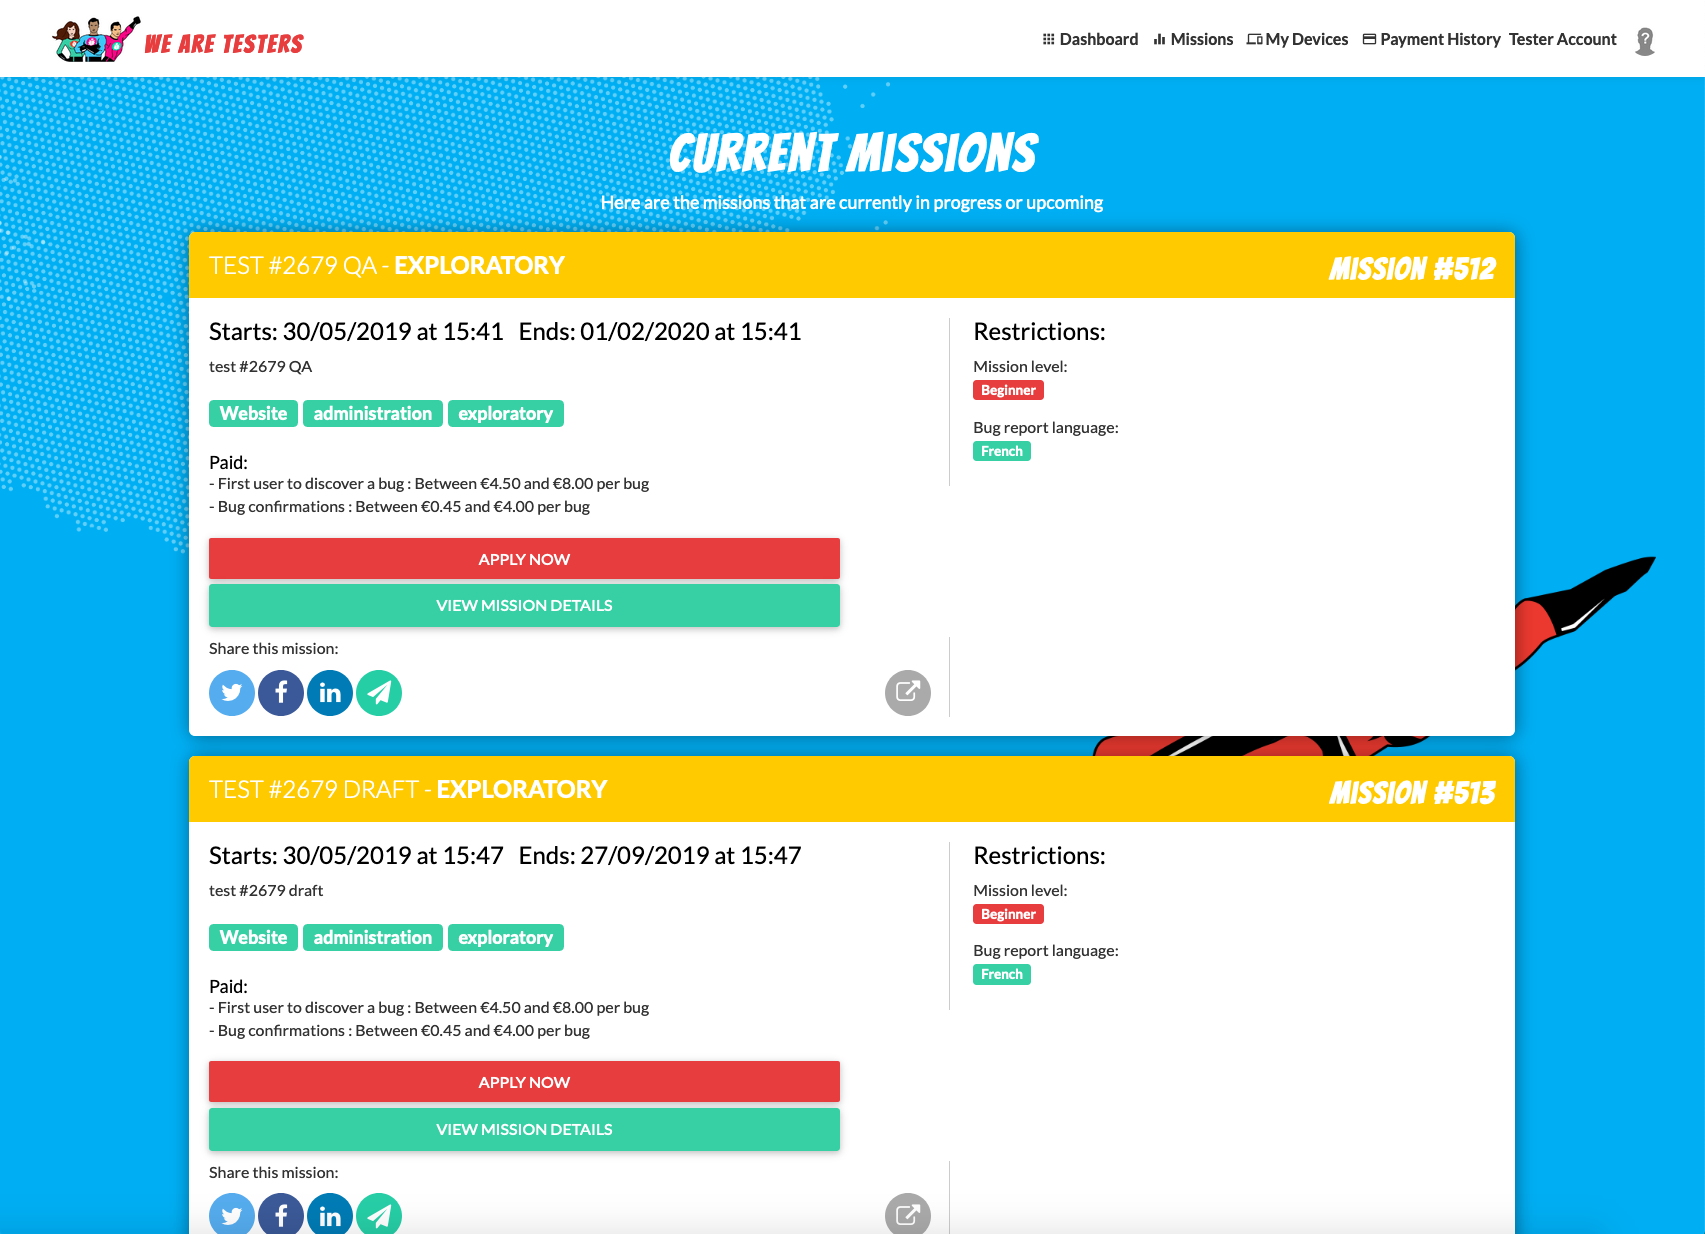
On the Other Missions page is where you’ll find all of the upcoming, in-progress, and completed missions.
On each mission card, you can obtain the missions’ key information.
Click on one of the sharing pictograms to share this mission on your social networks.
Click on the button APPLY NOW to apply to this mission. ( Pop-In "Apply Now")
Click on the button VIEW MISSION DETAILS to learn more about the mission. ( Mission Details)
¶ Mission Details
¶ As a Tester
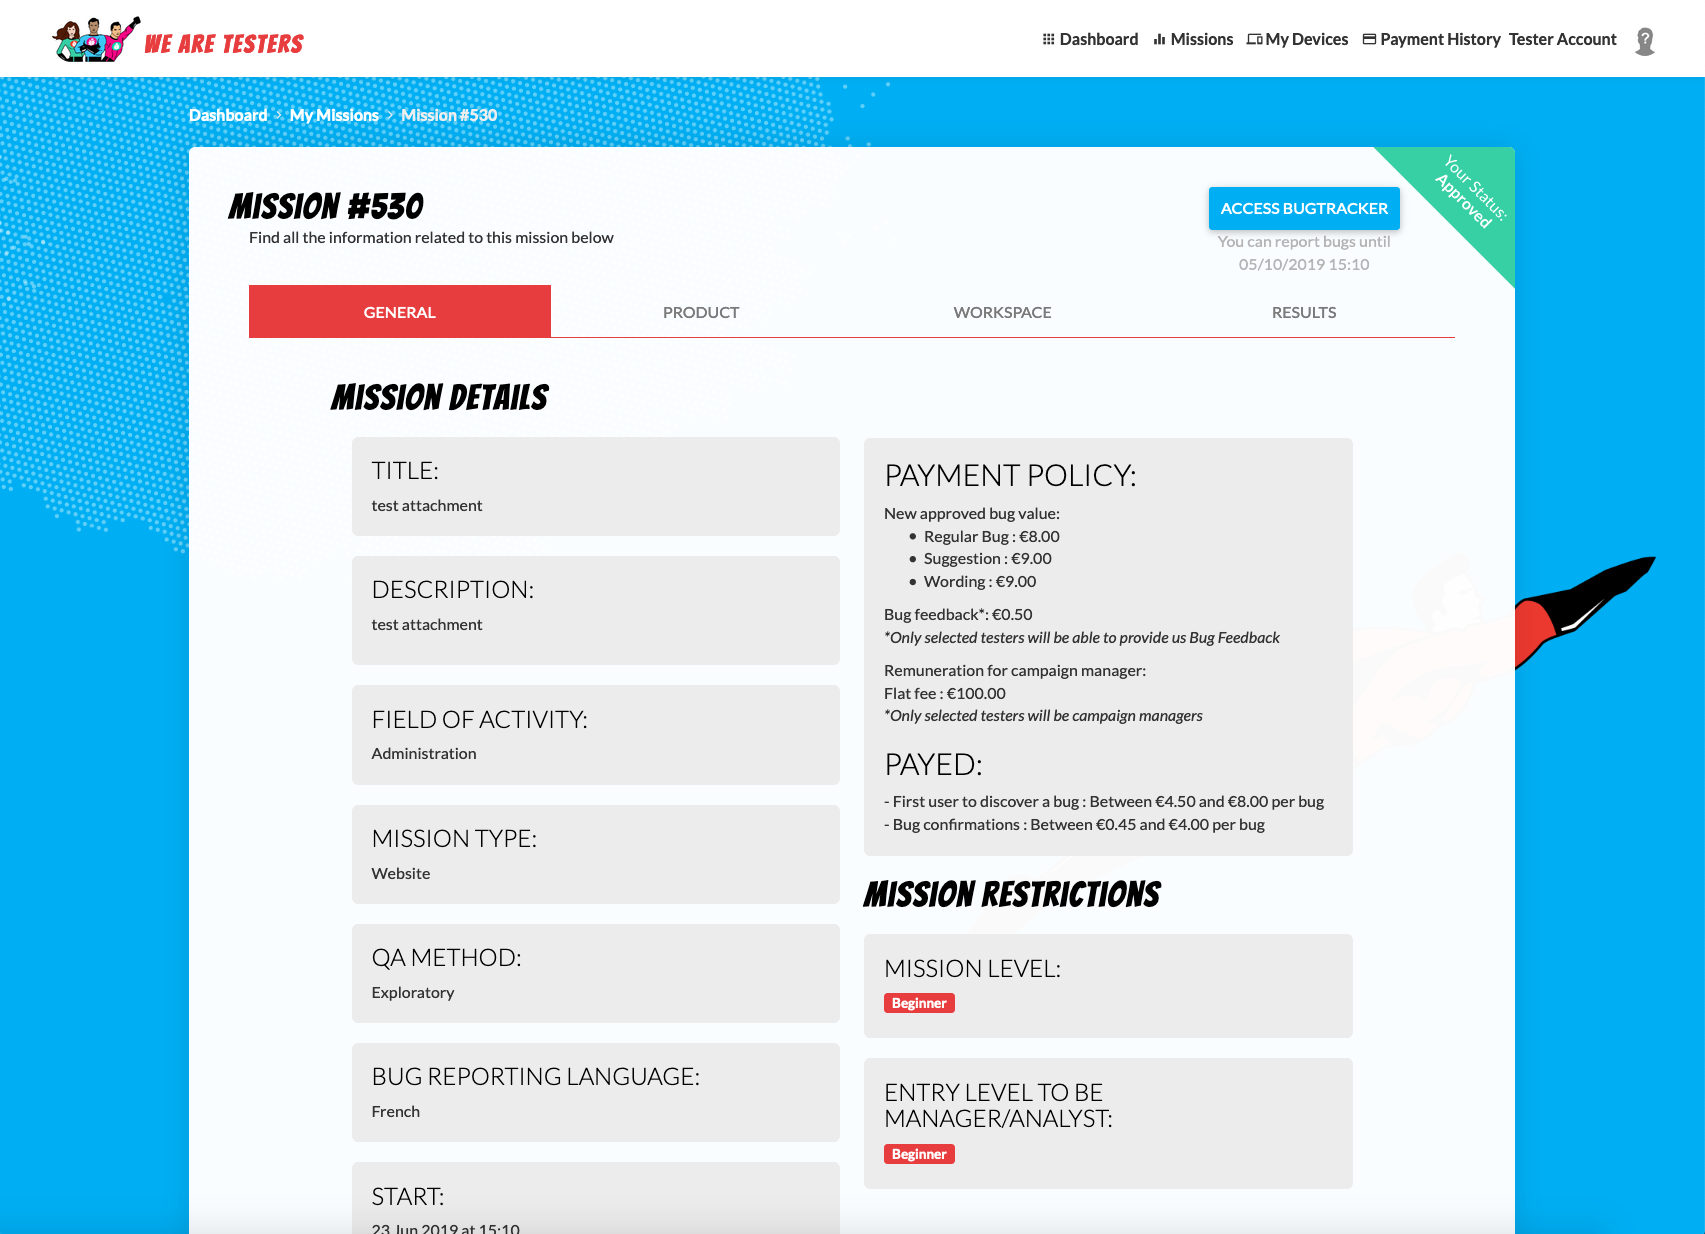
You can access the bugtracker for this mission by clicking on ACCESS BUGTRACKER. ( Bugtracker)
You can also view the mission details on this page by clicking on the different tabs :
GENERAL PRODUCT WORKSPACE and RESULTS.
Finally, at the bottom of each of these 4 tabs you can click on APPLY NOW to apply for the mission ( Pop-In "Apply Now").
¶ General
Here is where you will find a variety of information including the participation restrictions, payment policy, start and end dates of the mission, the QA method (exploratory or guided), etc…
¶ Product
If you applied and were accepted for the mission, the product tab is where you will be able to view the product’s content information.
You can also view the details on the digital platform that will be tested (application, website, etc..)
¶ Workspace
Having been accepted for the mission, you will be able to see the workspace content information.
You will be able to view the test environment details including notably the site’s URL or the application to download (however, you should always rely on the URL provided via the mission’s Slack on channel in order to be certain that the URL is up-to-date).
¶ Results
After having completed the mission, you will be able to see the content of this tab.
From this tab, you can view the details regarding the bugs found including your ratio of bugs, your feedback, and your total remuneration for this mission.
If you want to know more about how your remuneration is calculated, you can read our FAQ about payment here FAQ - Payment
¶ As a CM
If you have applied for the role of a CM (and have been accepted on the mission with this role) you can access the mission dashboard by clicking on the MISSION DASHBOARD button. ( Mission Dashboard)
¶ Pop-In "Apply Now"
¶ For Tester Missions
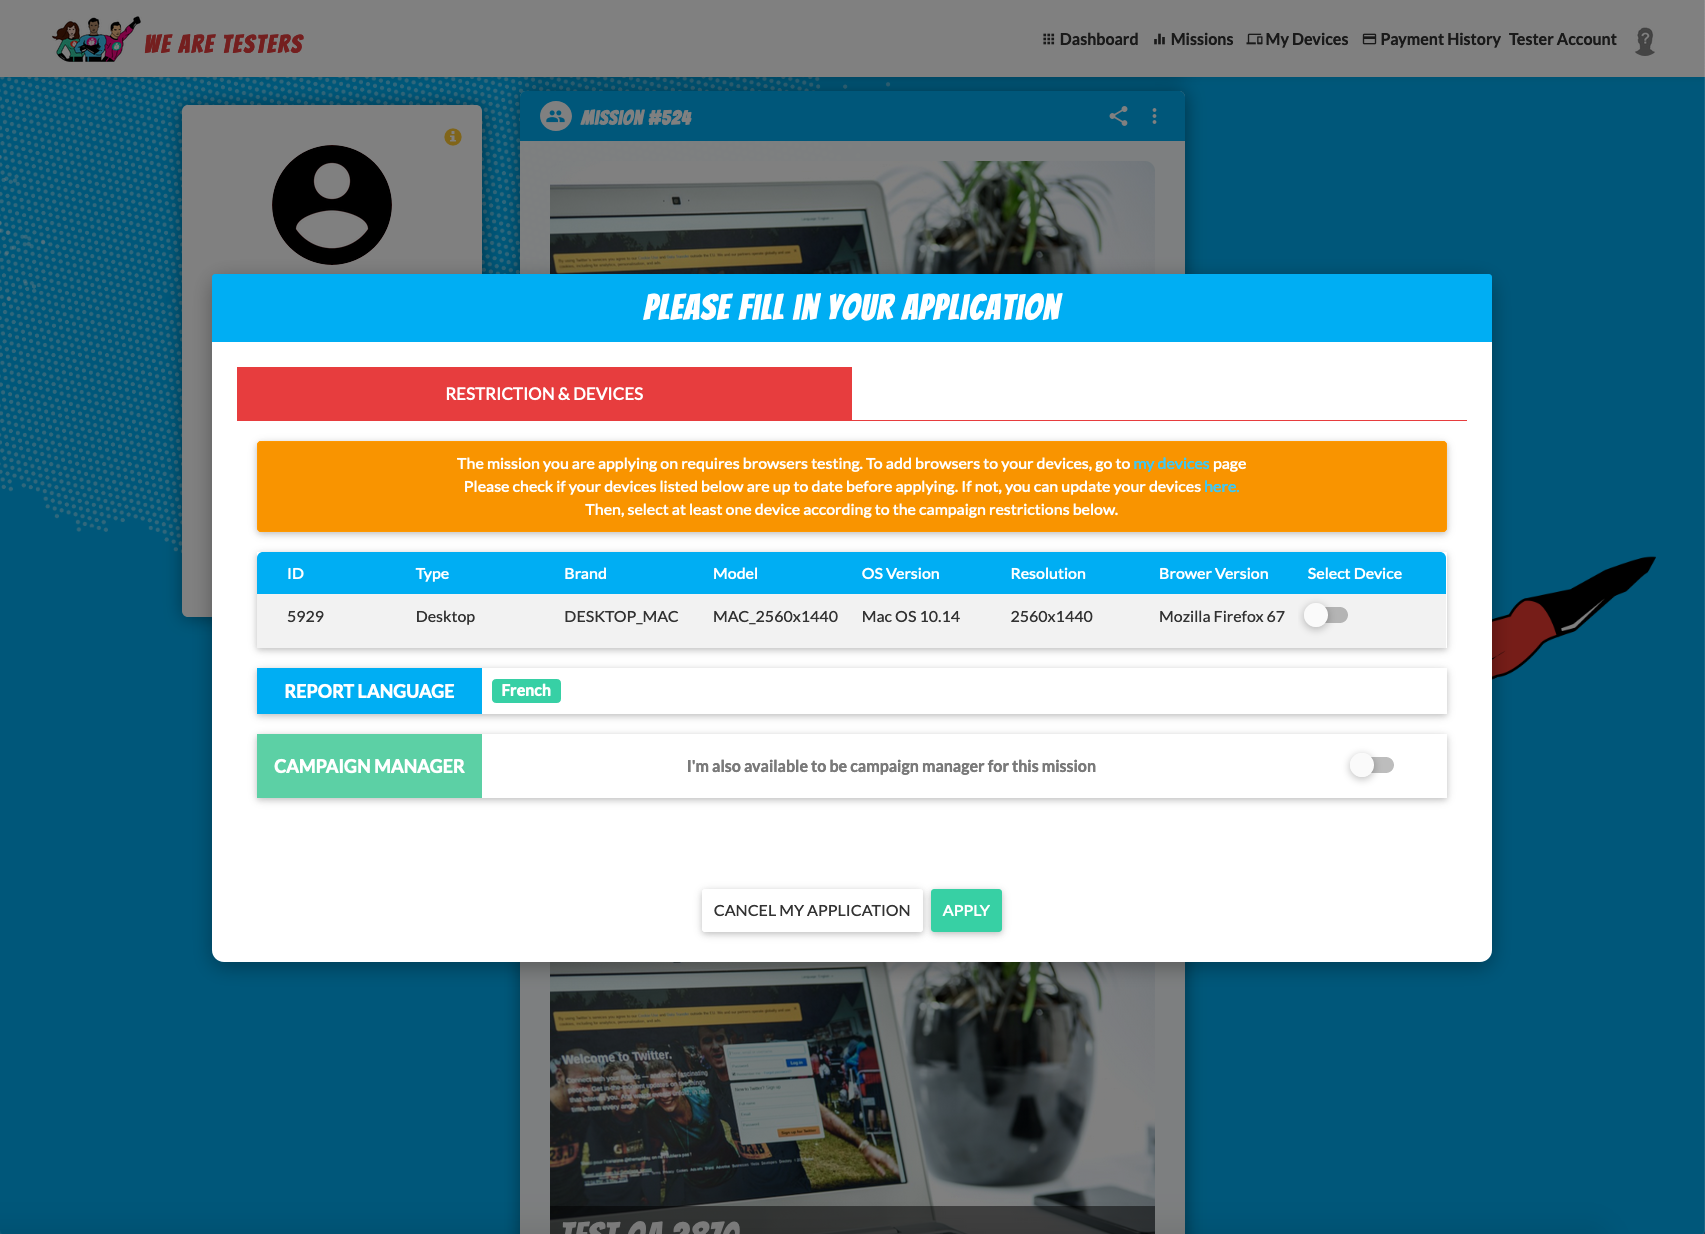
Read the restrictions and information regarding the mission, select the devices that you can actually use to execute the tests on the day of the mission before applying.
If the assignment is open to Campaign Managers, you can also indicate your interest in these assignments by applying for these positions.
Click on the APPLY button to apply for this assignment or on the CANCEL MY APPLICATION button to cancel.
¶ Mission Dashboard
¶ As a CM
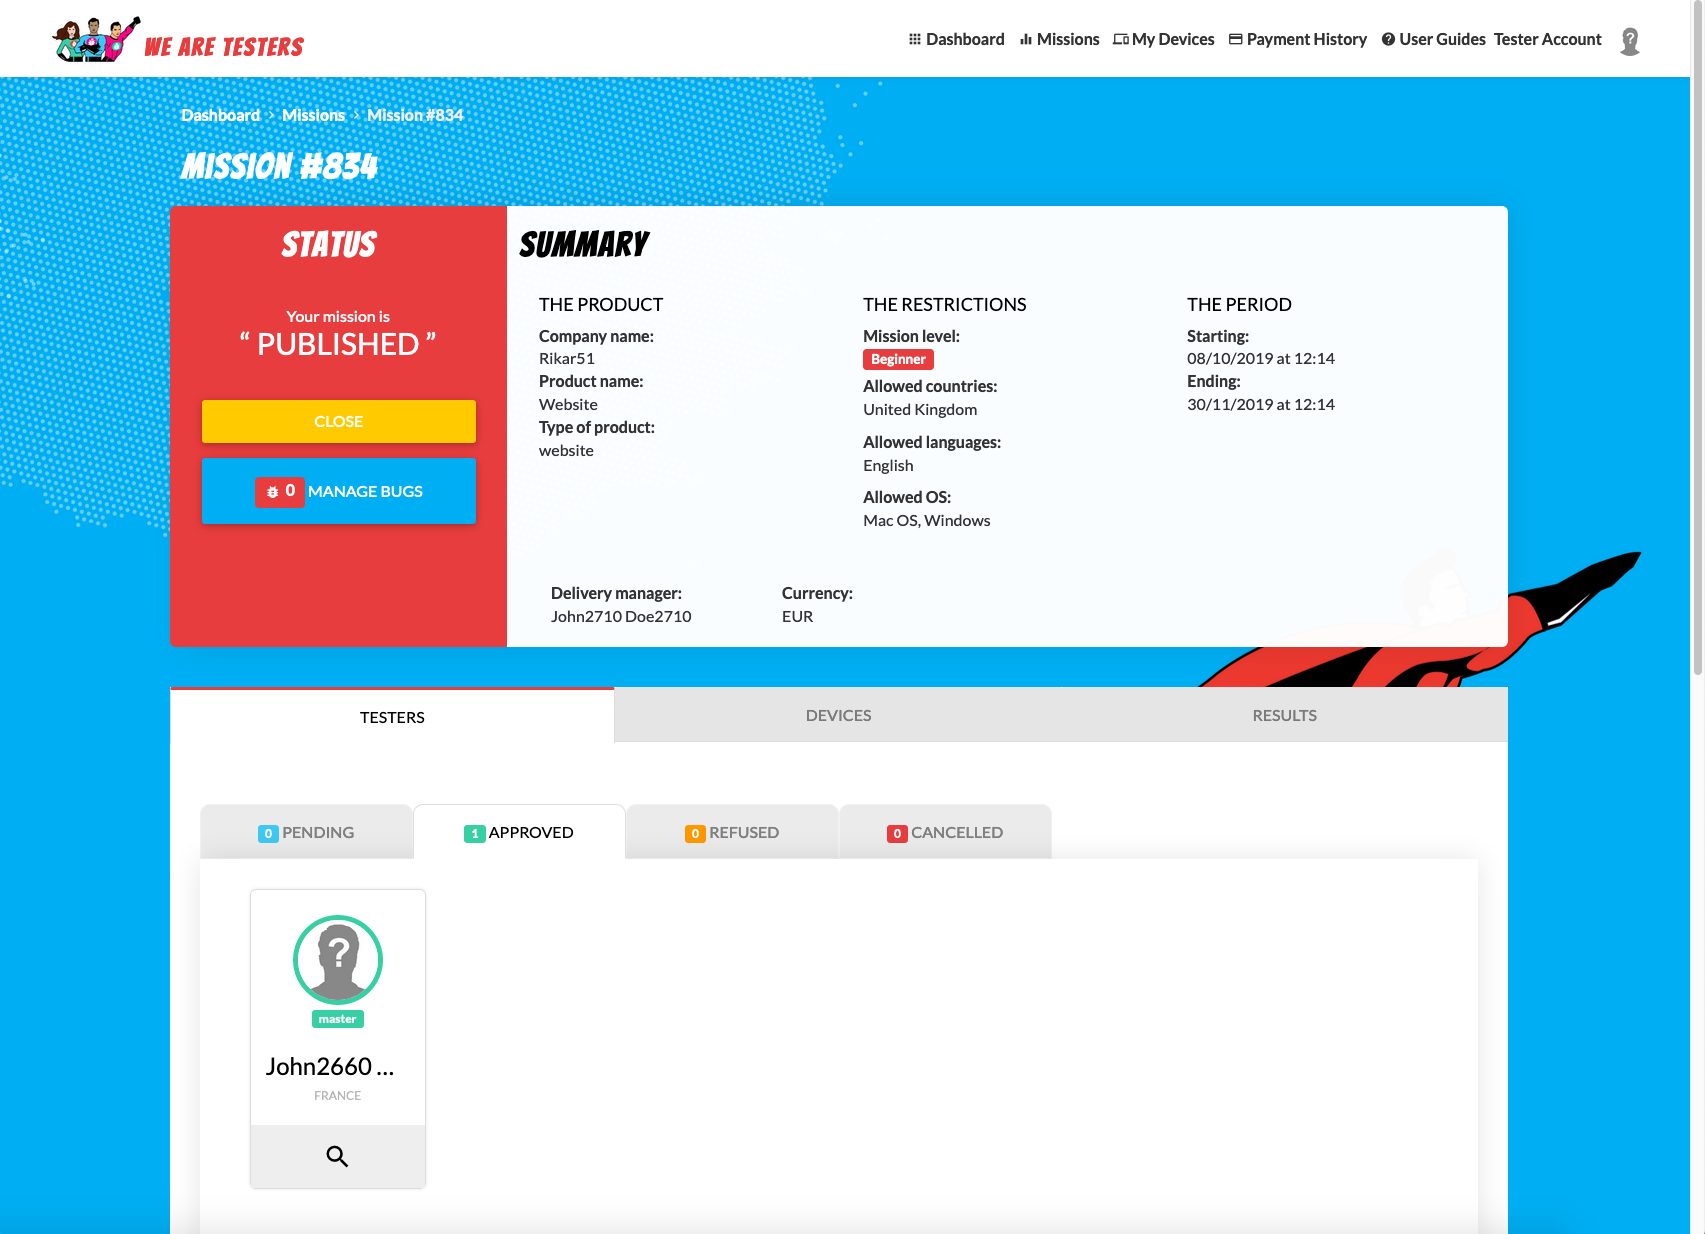
As a CM (and according to your rights for the mission) you will be able to view the mission’s administrator interface including the following elements:
-
The status of the mission (DRAFT, PUBLISHED, CLOSED, PUBLISHED RESULTS) and the summary of the mission in the sidebar at the top of the page. Below, you will find a detailed explanation of each mission status:
-
DRAFT: the mission has not been published and is still in draft mode. It does not appear on the testers’ dashboard and they cannot apply to it.
-
PUBLISHED: the mission has been launched. It appears on the testers' dashboard and they can report bugs if they are approved for the mission.
-
CLOSED: The mission is closed. The testers can no longer apply to the mission nor report bugs.
-
PUBLISHED RESULTS: The mission has been completed, the earnings are calculated and displayed in the mission results on the mission page. This status is irreversible.
You can influence the status of the mission (close the mission at the end of the campaign and/or reopen it if necessary) and manage the bugs reported by the testers by clicking on MANAGE BUGS. (
Bugtracker)
-
-
The TESTERS tab and its subtabs PENDING APPROVED REFUSED and CANCELED (if the tester cancels his or her participation) including the testers who applied for the mission. Statistics at the bottom of the page will give you an overview of the testers’ nationality and their testing level. You can view information about a tester in order to approve or deny his application by clicking on the magnifying glass pictogram under the tester's name. (
Pop-in "Application Review")
-
The DEVICES tab and its subtabs PENDING ACCEPTED and REFUSED provide information on testers’ devices for those who applied for the mission. Statistics at the bottom of the page will give you an overview of the device types and progress of the test on these devices.
-
The RESULTS tab displays the approved bugs for the different testers. To rate them, click on the tester’s name. (
Manage Results (User Rating))
Repeat this process for each tester and then click on the READY TO PUBLISH button to inform the DM that you have completed your mission as CM.
¶ Pop-In "Application Review"
¶ As a CM
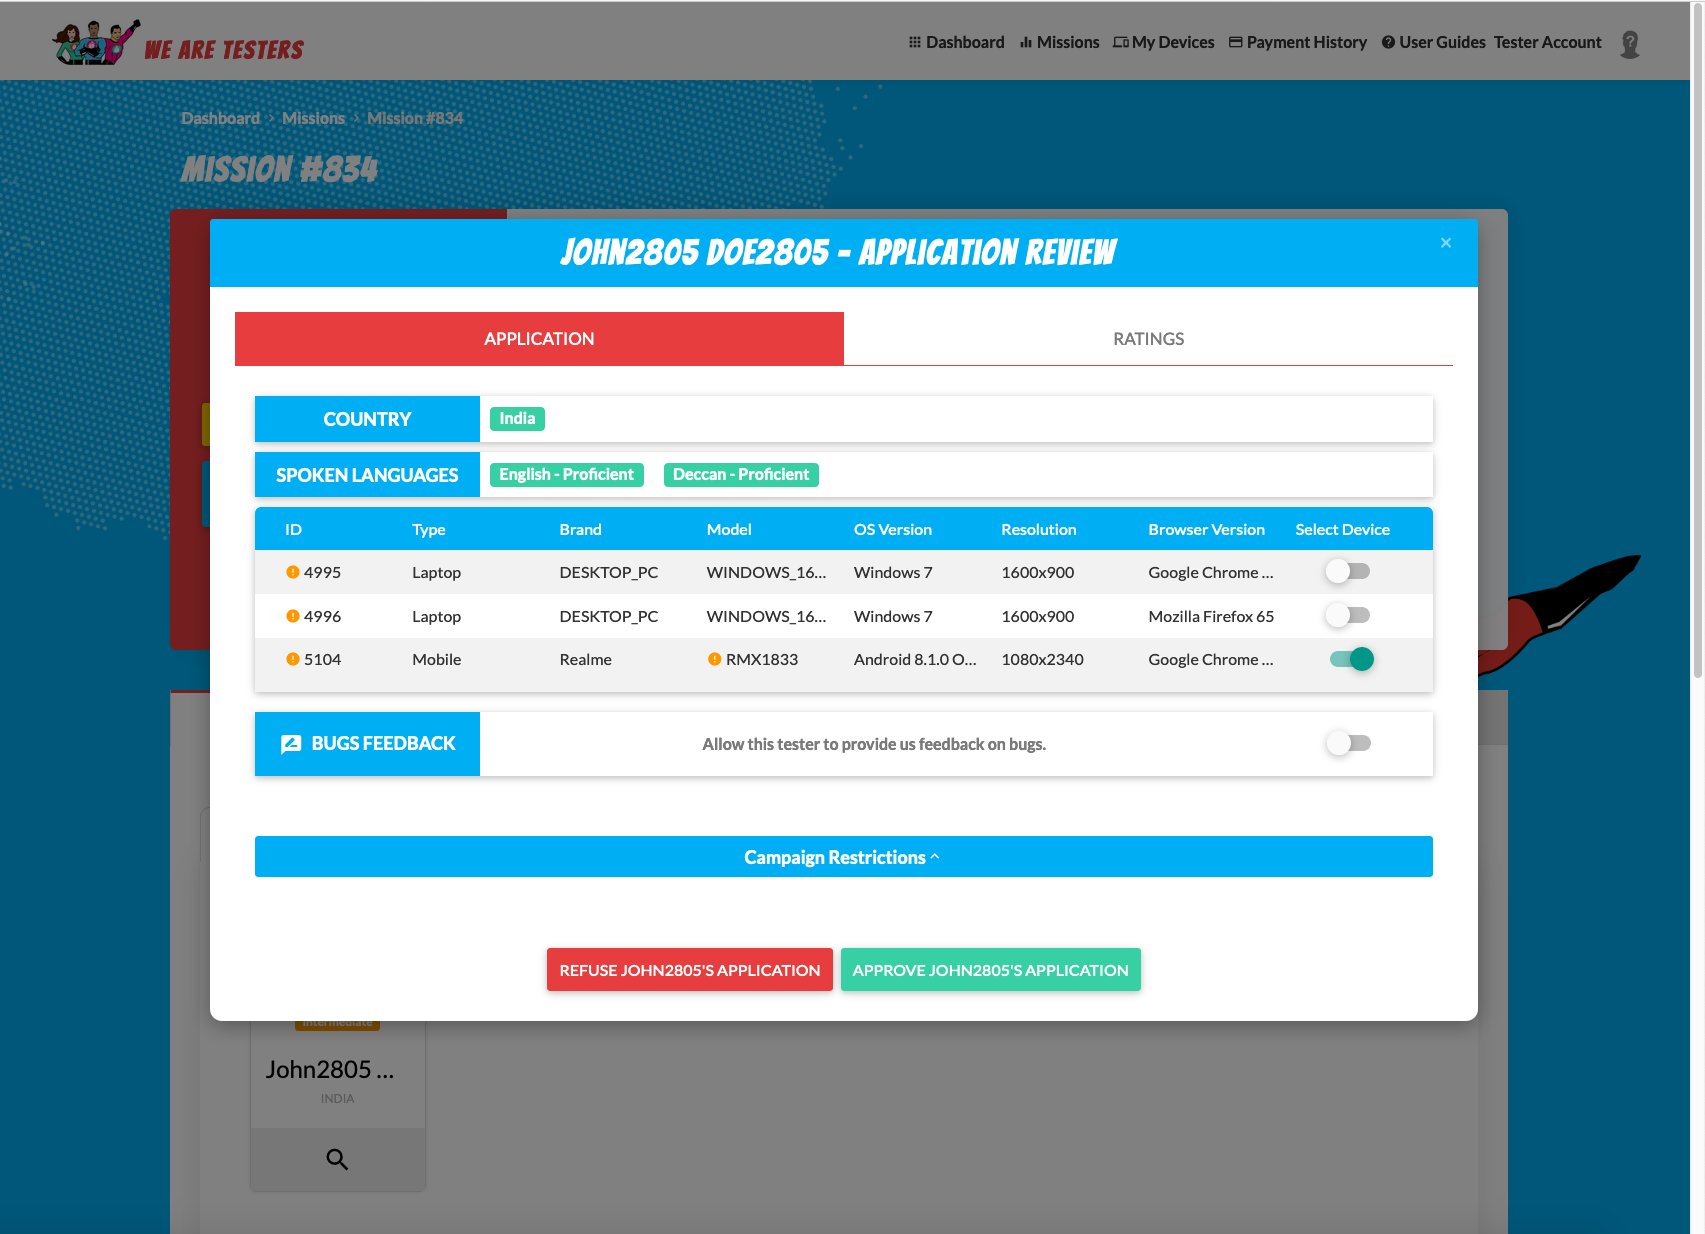
From this Pop-In, under the 1st APPLICATION tab, you will be able to view the information about the tester: Country of origin, languages spoken and their level of proficiency, list of devices and a reminder of campaign restrictions (hidden by default). You can also select/deselect devices that are relevant to the mission if necessary.
Under the RATINGS tab you will see the averages of the tester’s scores and ratings from previous missions, which will help you decide to accept or reject the tester’s application.
At the bottom of the Pop-In, you will find two buttons: REFUSE TESTER’S APPLICATION and APPROVE TESTER’S APPLICATION. ( Mission Dashboard)
¶ Manage results (User rating)
¶ As a CM
On this page, you will first see the section "Manage approved bug reports" which lists the tester’s approved bugs.
Use the search field to find a particular bug.
Use the table tools to reduce/increase the number of rows, and show/hide columns.
Once the mission is classified as CLOSED:
Within the “Rate the tester” section, you will be asked to rate the tester according to his or her level of English.
In the section “Comment (Internal Use)” you can leave a comment about a tester for other CM’s or DM’s.
At the end of the section “Say something to the tester (readable by the user)” you will be able to leave a comment for the tester.
Upon filling all the text fields, click on the button SAVE AND BACK TO RESULTS LIST to save the tester’s evaluation, or on the button BACK TO RESULTS LIST to cancel the evaluation. ( Mission Dashboard)
