¶ Bugtracker
¶ YOUR DEVICES AND ACTIVITY
¶ As a Tester
On this page, you can see the status of all your different approved devices for this mission. Under this first insert you have a view on all the bugs reported so far by all the other crowd testers participating in this mission. You can click on a bug to see the details of this bug. ( Pop-in "Bug #xxxxx")
Click on the START TESTING button to tell your Mission Manager that you are starting the test on this device, and to begin reporting bugs.
This START TESTING button is changed to STOP TESTING. Click it again when you have completed your test on this terminal. It changes to RESUME TESTING to allow you to click on it again to resume your test.
If this is a guided mission, you will be redirected to another tool, BugTrapp, also developed by StarDust. In Warning's Pop-in, click on the Ok! button to accept the redirection, or on the CANCEL button to cancel (you are still required to go through BugTrapp for guided missions, or you will not be able to follow the test steps and report bugs). ( BugTrapp (Guided Tests))
¶ As a CM
(and according to your rights for the mission)
You have access to 2 buttons at the top of the page: SUSPEND and CLOSE THE MISSION.
- The SUSPEND button allows you to suspend bug reporting for the mission, without closing it (useful for example if the test environment is unavailable for a certain time, thus preventing testers from reporting unnecessary bugs). By clicking on the button, a Pop-in will appear asking you to choose between suspending the creation of new bugs only, or suspending the entire bugtracker (creating, editing and deleting bugs). A text field (mandatory) will allow you to indicate the reason for this suspension. Click on CANCEL to cancel, or on SUSPEND to confirm the suspension.
- Once suspended, your message will be posted (visible to everyone) at the top of the page and the SUSPEND button will be changed to RESUME THE CAMPAIGN. Click on this button (and then click on the Yes button in the confirmation pop-in) to reauthorize the testers to report bugs in the bugtracker.
- The CLOSE THE MISSION button has the same effect as the CLOSE button on the Mission Dashboard page, and therefore allows you to close the mission. If you do this from the bugtracker, you will automatically be redirected to the Mission Dashboard page, which will display the new mission status: "CLOSED". If you need to reopen the mission, you can still do so by clicking on the RE-OPEN button. You will no longer be able to do this after the mission has been set to "PUBLISHED RESULTS" status.
¶ BUG LIST
¶ As a Tester
You can use the search bar to find a particular bug.
You can use the table filters or tools to decrease or increase the number of lines, and to show or hide columns.
Click on the bug ID number in the Bug List to see its details.
If you click on one of your bugs, you can update it or delete it.
If you click on another tester’s bug, you can add your device(s) to it.
Click on the REPORT A BUG button to report a bug on the device(s) noted as started. ( Pop-in "Report A New Bug")
¶ As a FP
If you have Feedback Provider rights, you will also see an additional "Review" column, allowing you to know which bugs remain to be reviewed. The "eye" pictograms can be several different colors:
-
Red: You have already “disliked” this bug
-
Green: You have already “liked” this bug
-
Yellow: At least one tester FP has provided feedback
-
Grey: The bug has not received any feedback
Click on the bug created by another tester to display the bug’s detail pop-in window. ( Pop-in "Bug #xxxxx")
¶ As a CM
(and according to your rights for the mission)
You will always have the ability to approve or reject the bugs reported by the testers.
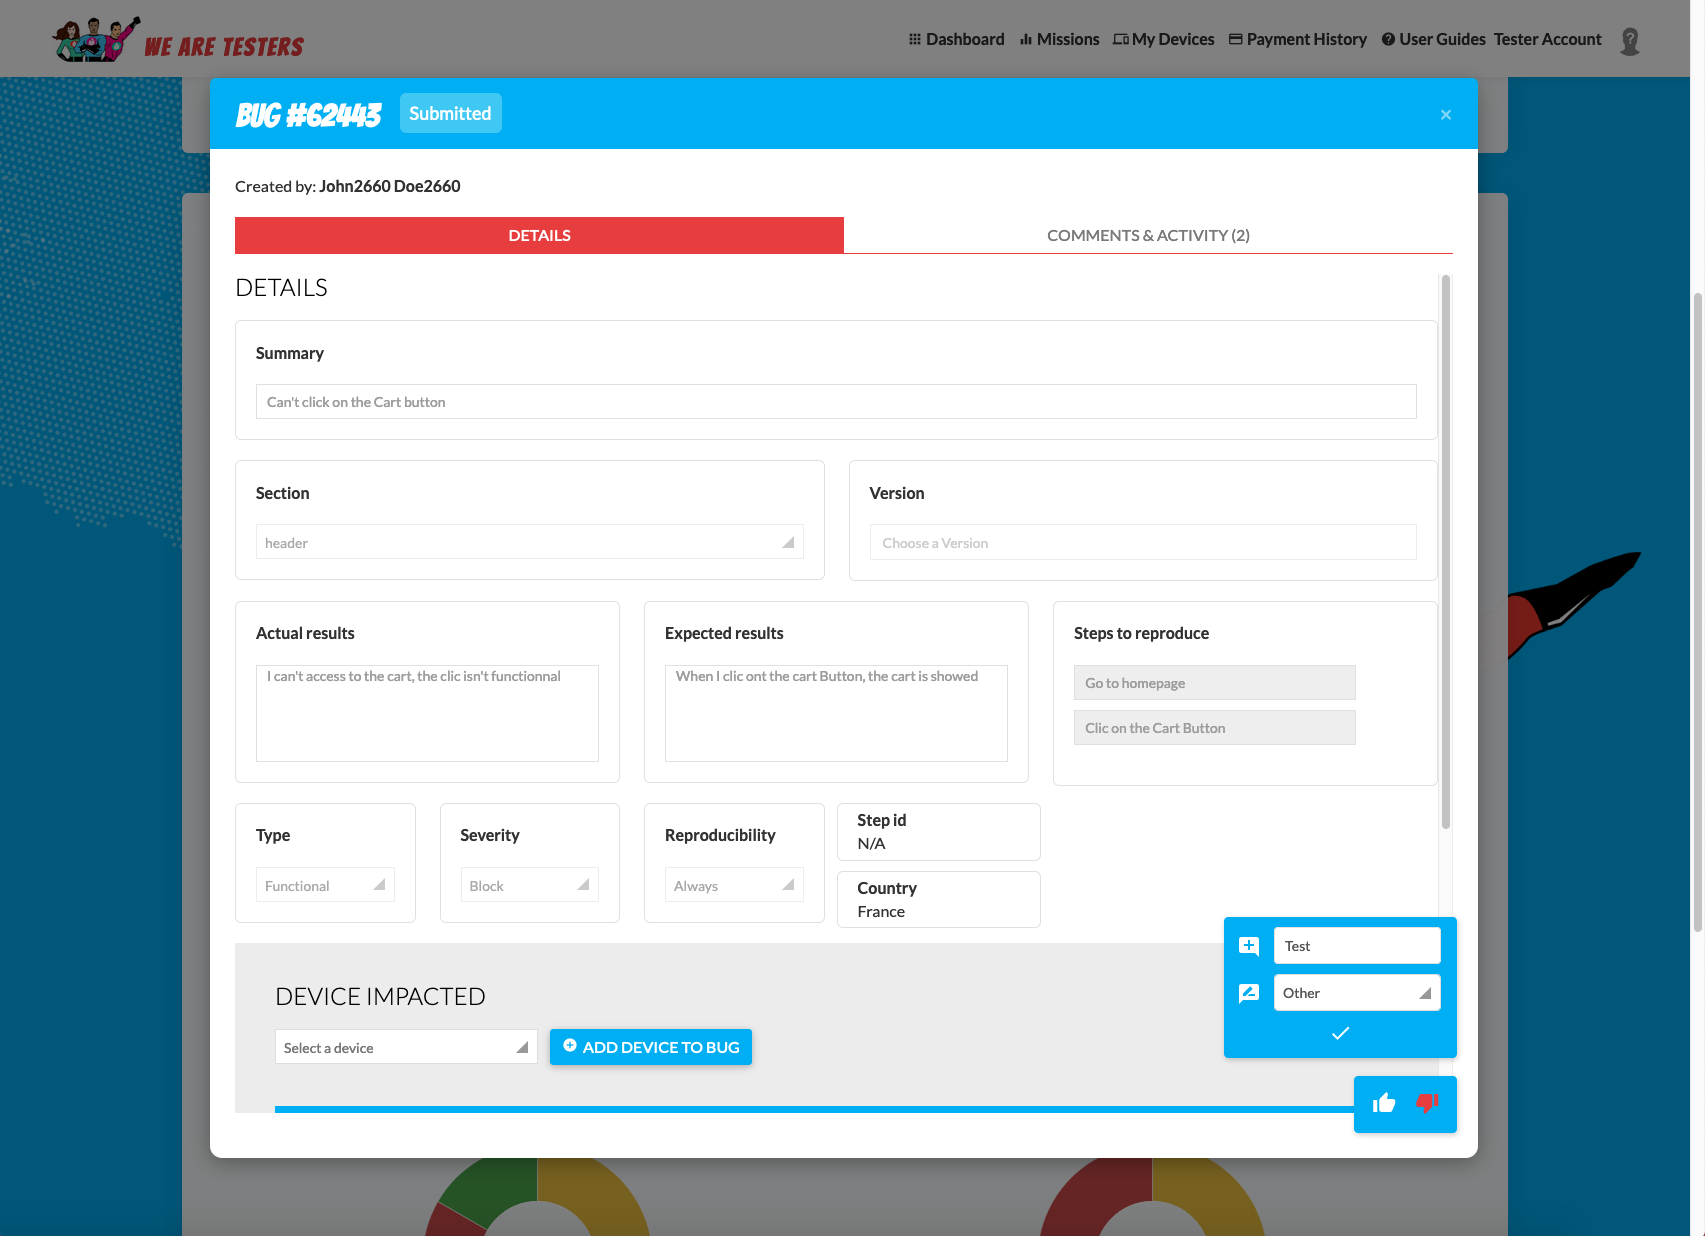
To do this, display the bug by clicking on its ID number. Browse the bug and go to the bottom of the page in the DETAILS tab to find the bug approval insert. You will find the following elements:
-
Status: By default, the status is set a “Submitted.” According to the situation, you can change the status of the bug to Incomplete, Approved, or Refused.
-
Price Type: Choose the payment type for each bug (“Regular”, “Suggestion” ou “Wording”).
-
Status Reason: Here, choose the reason for a bug rejection ("Duplicate", "Not a bug", "Out of scope", "Known Bug", "Other:"). If you select "Other:" a new text field will prompt you to describe this reason.
-
Comment : Add a comment to tell the tester why you refused his bug (or noted it as "Incomplete").
Once you have made your comments, click on the UPDATE BUG button, or click on the CANCEL button to cancel the approval.
Do the same for all the bugs in the mission.
¶ Pop-In "Report A New Bug"
¶ As a Tester
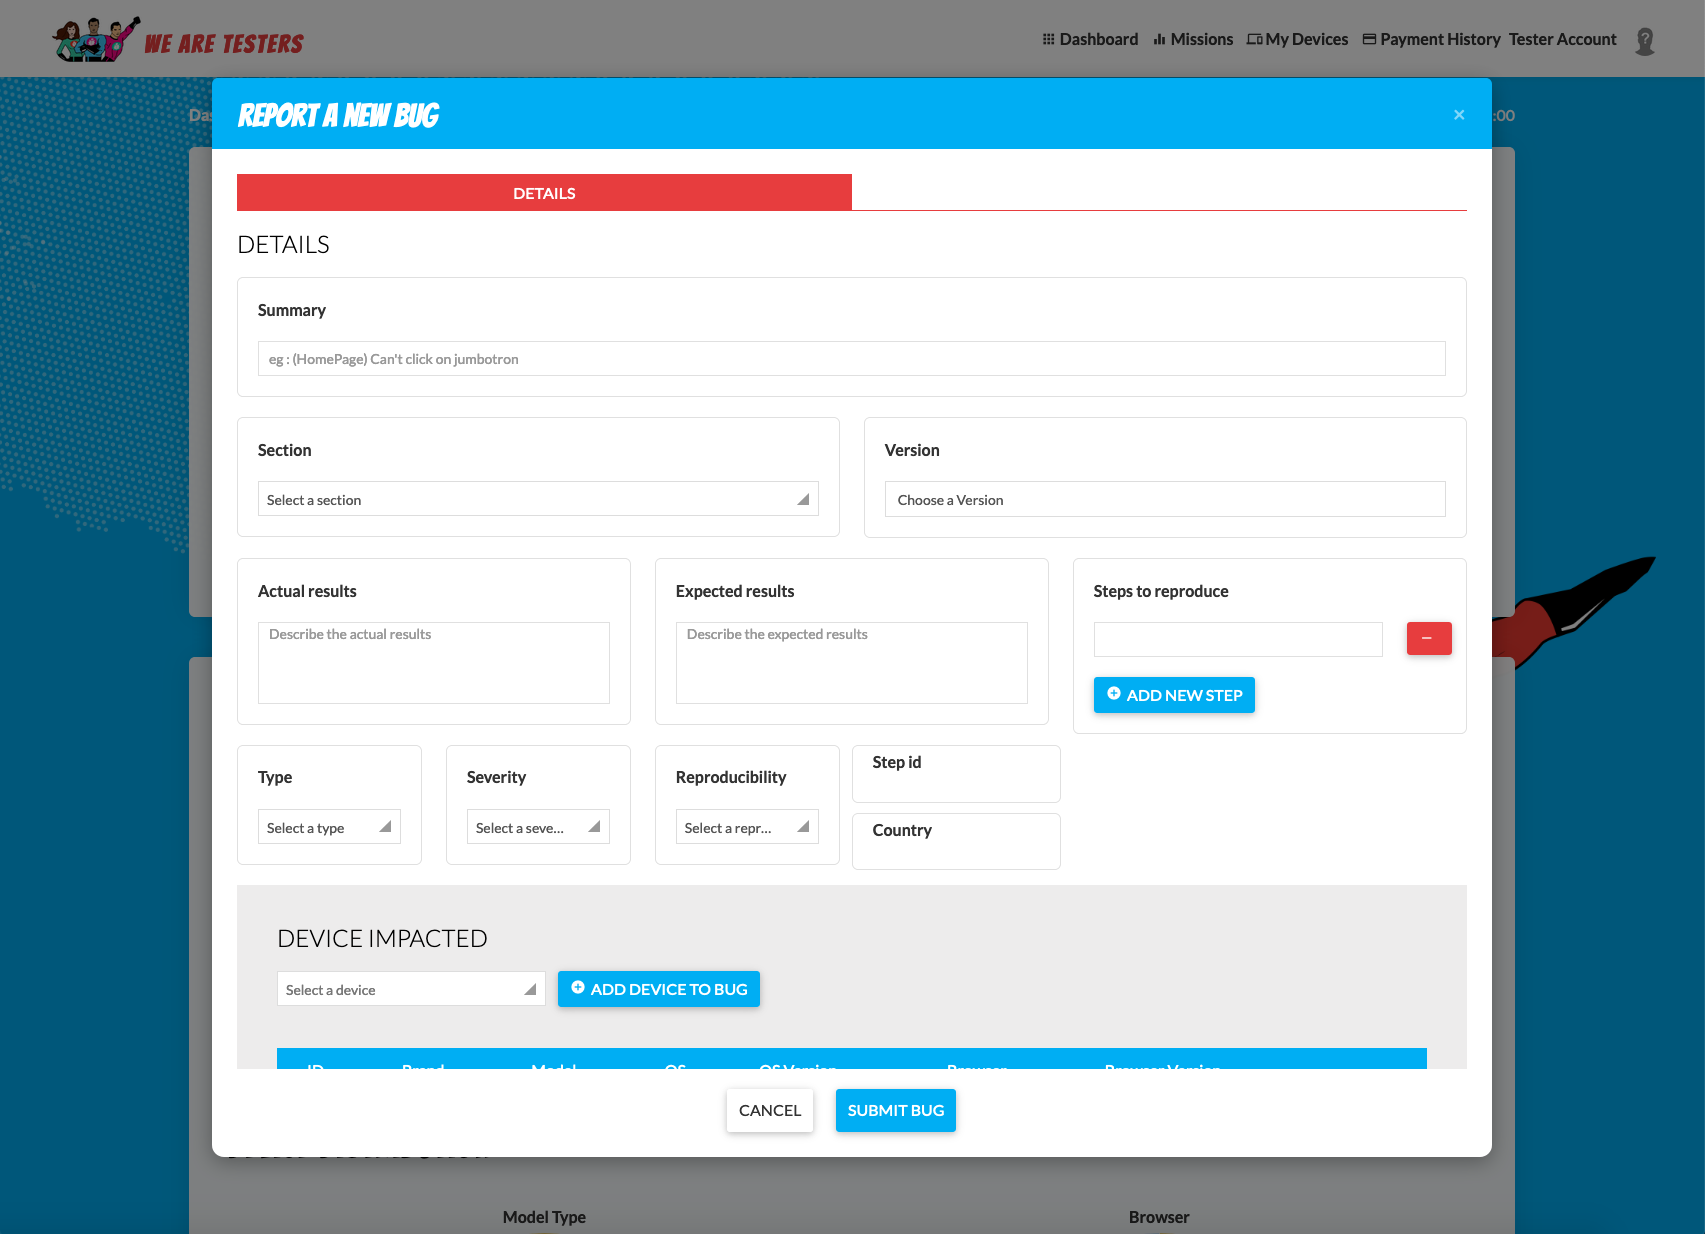
In this pop-in, you can view the different fields to complete to create your bug ticket in the WAT BugTracker.
The following mandatory fields are present:
-
Summary - The title of your bug. Must be as precise and concise as possible and must respect the template provided in the instructions.
-
Actual results - Here, describe the observed behavior or results on your device.
-
Expected results - Describe the expected results or behavior when functioning normally.
-
Steps to reproduce - List the steps to take to reproduce the bug or same behavior observed.
-
Type - From the drop-down menu, choose the type of bug described (Graphical, Functional etc…)
-
Severity - From the drop-down menu, choose the severity of the bug described (Major, Minor etc…)
-
Reproducibility - From the drop-down menu, select the frequency at which you observe the bug (Once, Always etc…)
On this page, you will also see the following optional fields:
-
Section - Your Mission Manager was able to create sections to better target bugs. For example, Homepage, Cart, and more which can be selected from this drop-down menu.
-
Version - In the same way, you may have several versions of a site or application to test (ex: iOS or Android, or different builds), it is from this drop-down list that you can select them.
The Step ID and Country fields are automatically filled in when the ticket is created.
Of course you must indicate at least 1 device affected by this bug. Select the device and add it to your bug by clicking on the ADD DEVICE TO BUG button. You can add several if the bug occurs on several devices, and delete if you added one by mistake.
And finally, it is strongly recommended to add at least one attachment to your bug in order to illustrate it and have the best chances to get it validated (Good practice: add a screenshot/video per OS and device type).
Click on ADD ATTACHMENTS (or drag and drop your attachment into the insert) to add this attachment to your bug ticket.
Once all fields have been filled in, click on the SUBMIT BUG button to create and submit your bug for validation or on the CANCEL button to cancel the entry of this ticket (be careful you will lose all entries by clicking on CANCEL)
¶ Pop-in "Bug #xxxxx"
¶ As a Tester
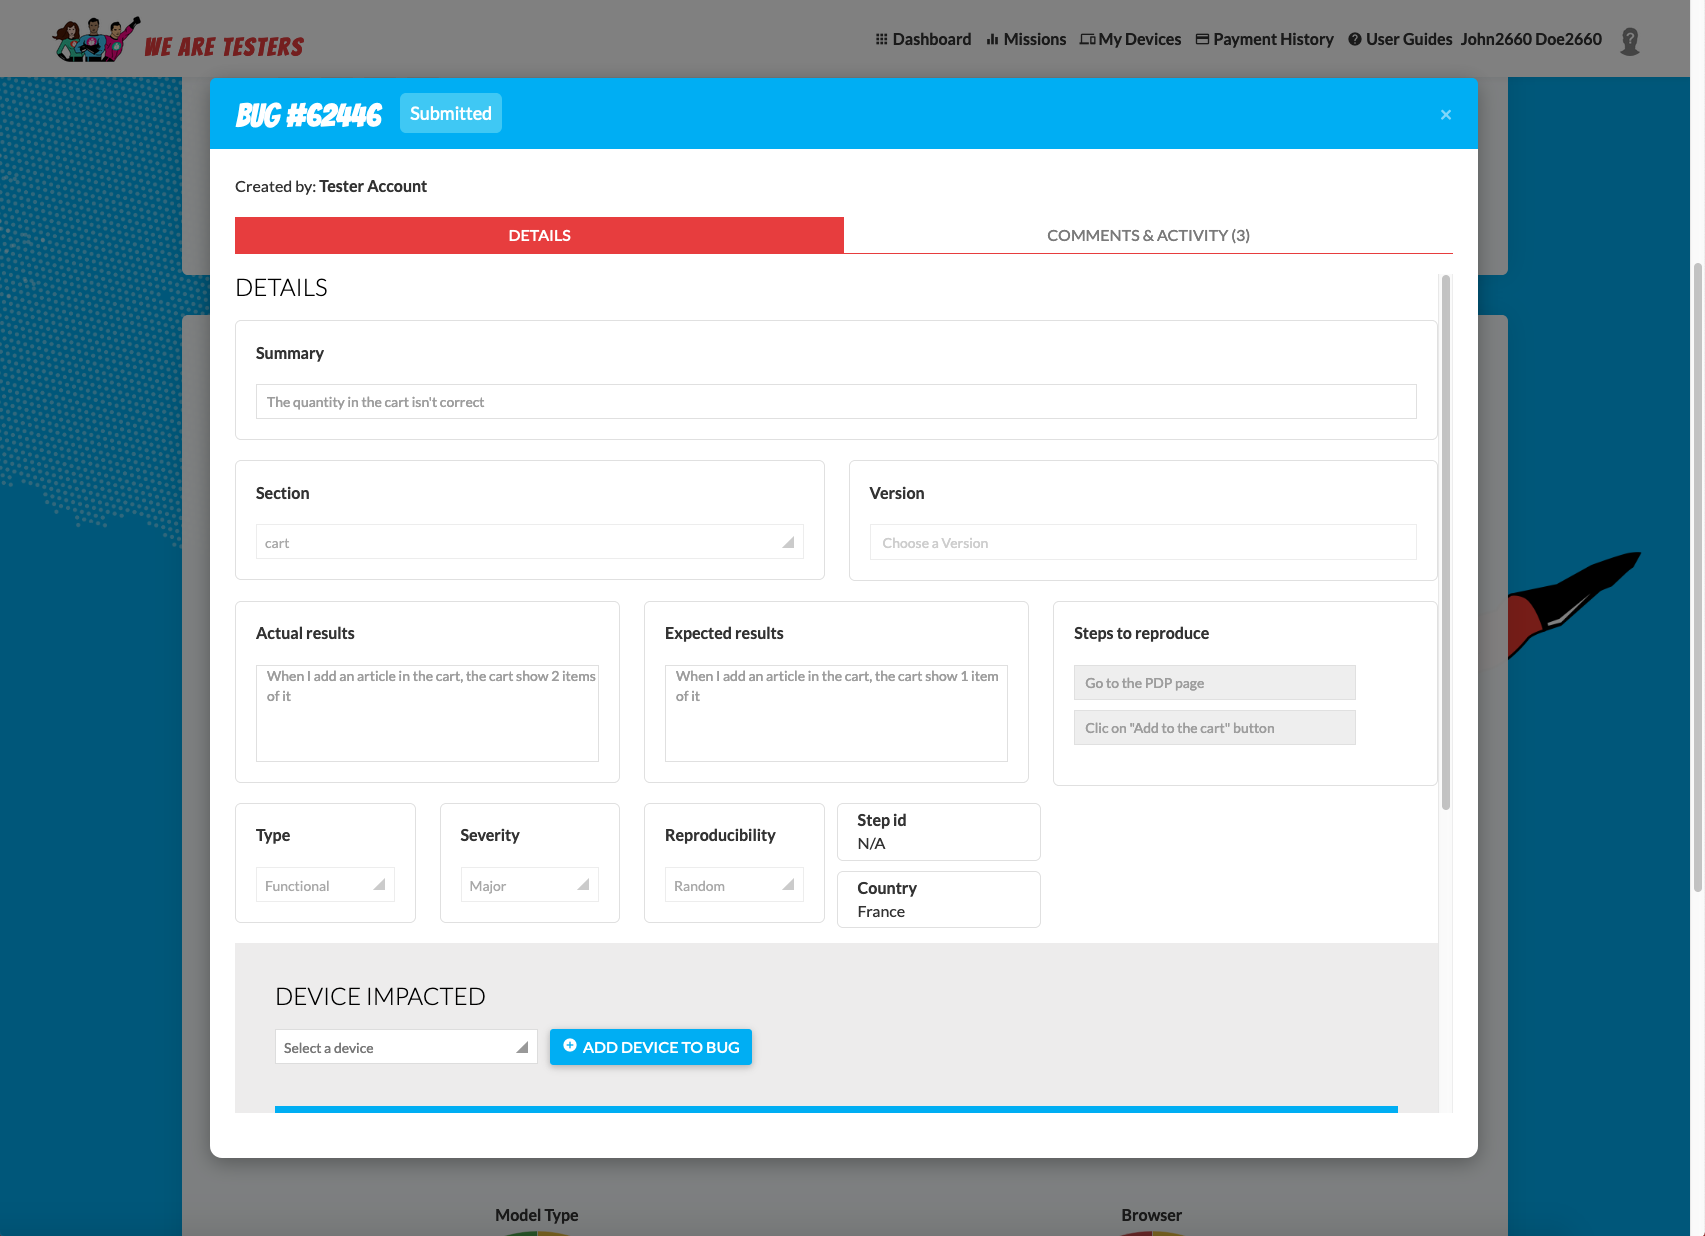
In this pop-in, you can view the different fields filled for this bug.
You can see two Tabs : DETAILS and COMMENTS & ACTIVITY
The following fields are displayed:
-
Summary - Bug title
-
Section - Section where the bug was detected
-
Version - Version of the tested product
-
Actual results - Observed behavior on the tested device(s)
-
Expected results - Expected results or behavior when functioning normally
-
Steps to reproduce - Listed steps to reproduce the bug or same observed behavior
-
Type - Type of bug (Graphical, Functional, etc…)
-
Severity - Severity of the bug (Major, Minor etc…)
-
Reproducibility - Frequency in which the bug was observed (Once, Always, etc…)
-
Step ID - The Step's number where the bug was detected (for Guided Missions Only)
-
Country - Tester’s localization
For bugs that appear across more than one device, here is where you can add the additional devices to the bug ticket. Select the device and add it to your bug by clicking on the ADD DEVICE TO BUG button. You can add several if the bug occurs on several devices, and delete if you added one by mistake.
Next, you will see all the attachments added to this bug.
¶ As a FP
You can leave a comment about the bug thanks to thumbs up icon (Like) and the thumbs down icon (Dislike).
You deem the bug warrants a dislike, you should then choose a status: Duplicate, Not a bug, Out of Scope, Missing Attachment, Missing Information, Other.
Validate your status: you will receive a notification “Review Successfully Updated” indicating that your review has been saved.
Close the window to move on the next bug. ( Bugtracker)
¶ BugTrapp (Guided Tests)
¶ As a Tester
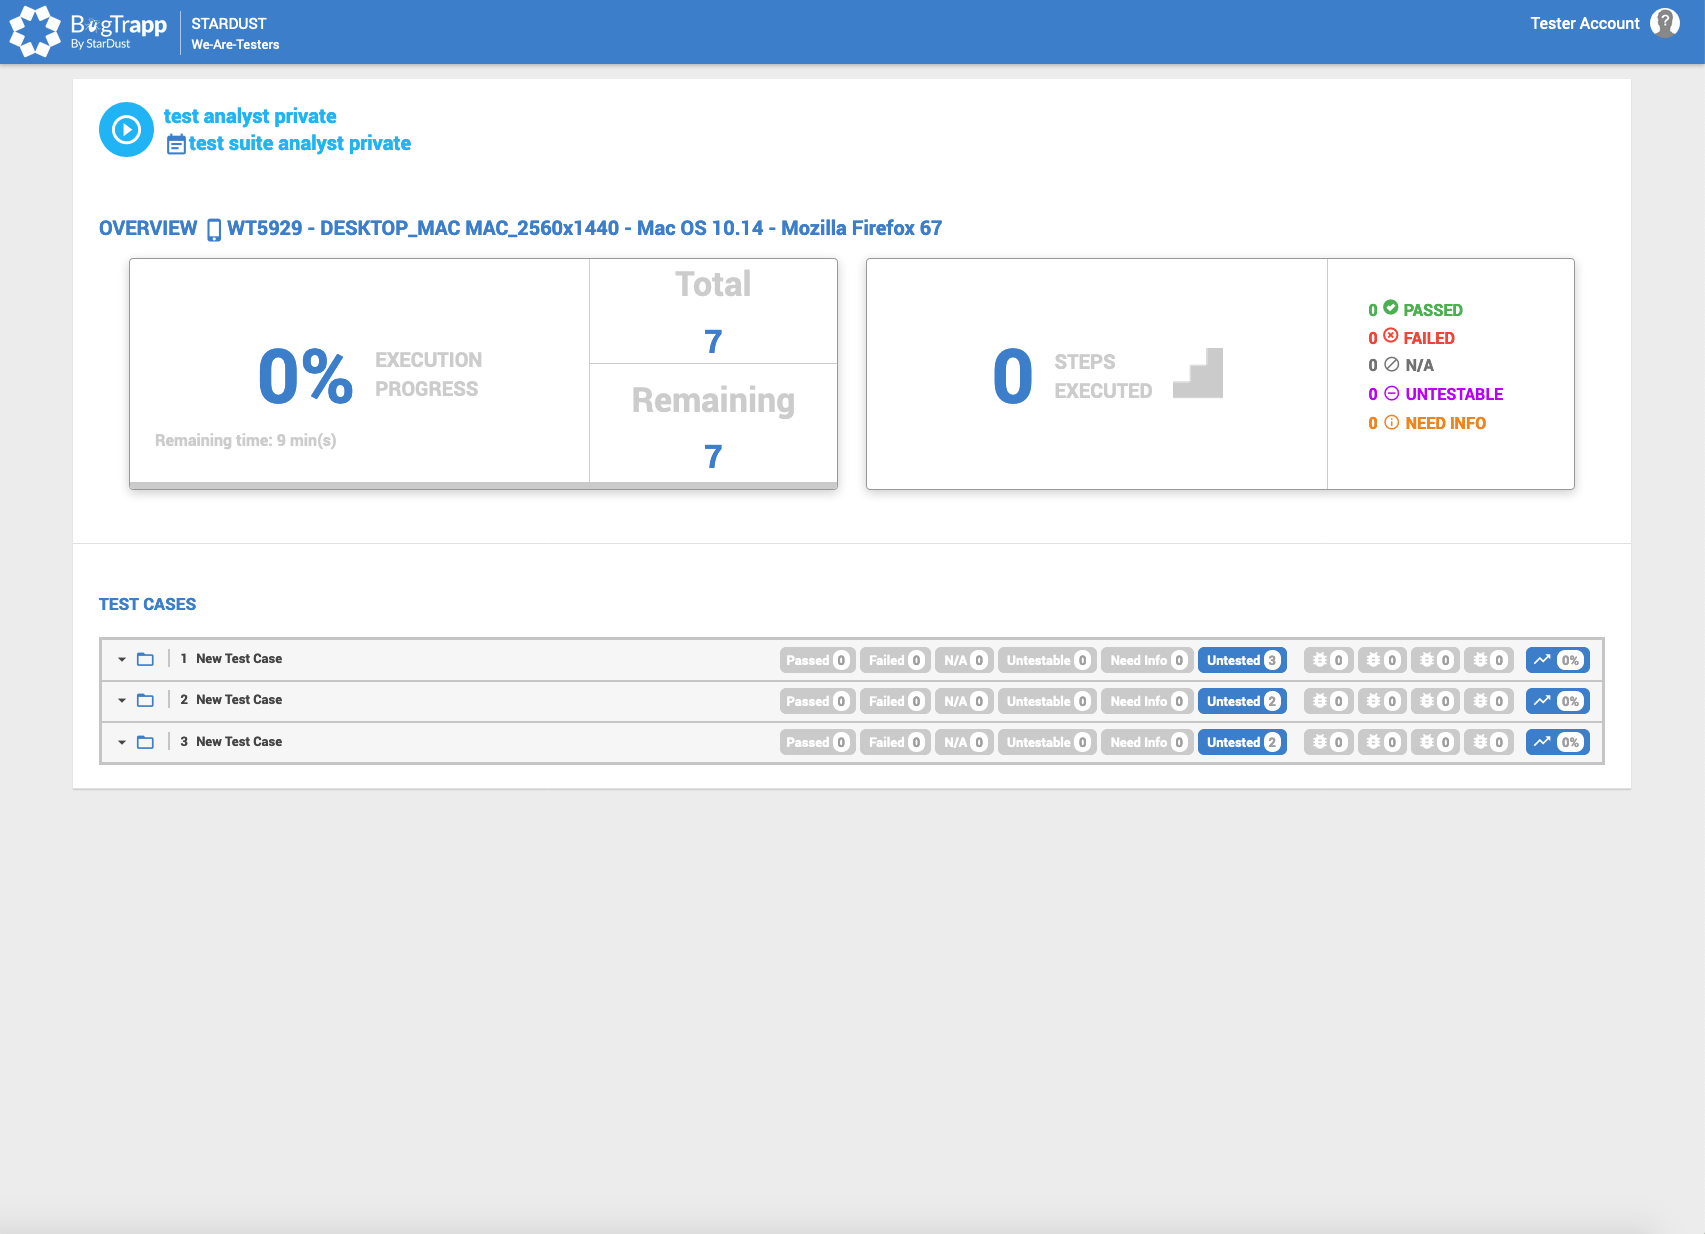
On this page you can see all the "Test Cases" and "Steps" to be followed for the mission as well as various information on the execution of this "Test Suite" (Number of steps, progress...).
Click on the triangle to the left of "Test Case" to unfold it and see the all "Steps" it contains.
Click on the Play button to the left of step 1 to start running the Test Suite.
Complete the action requested by the Test Description on your device, check if you get the Expected Result and select the status of the step from the drop-down list to the right of the step:
-
Untested (by default) : the step was not tested yet
-
Passed : The step is OK - the result observed on the device is identical to the expected result. Once this status is selected, the next step switches automatically to “Play”
-
Failed : The step is KO - the observed result on the device is different from the expected result. For this status:
-
Click on the New Bug button to describe the new bug associated with this step (→ Pop-in "New Bug")
-
You can also add your device to a bug already created for this step (on this device or any other device tested on this Test Suite). Click on the banner labeled THIS for bugs already documented on this device, or on the ALL banner (open by default) for bugs already documented on any other device (from any tester). Next, click on a bug to open a Pop-in containing the bug file and its details (and check that you have selected the right bug). Finally click (in the right column Actions) on the + button to add your device to this bug, or on the cloning icon to clone this bug and make your changes.
-
You can finally link a bug already created for another step. Click on the LINK EXISTING BUG button. A Pop-in window will prompt you to select the Test Case and Bug ID of the bug you need to link to your step and click SAVE
-
These actions will automatically change the status of the step to Failed
-
-
N/A : Not applicable - the step isn’t relevant on the testing device (the device is outside the test perimeters). A Pop-in window will ask you to explain why you choose this status N/A
-
Untestable : the step cannot be tested, the status used after a Failed step. A Pop-in comment window will prompt you to indicate which step prevents you from testing this Untestable step.
-
Need Info : the step is not clear enough to be executed, more information is required. A Pop-in comment window will prompt you indicate what information is needed.
You can pause this step by clicking on the pause button to the left of the step.
You can add a note to the step’s Test Description by clicking on the note icon to the right of “Test Description.”
Proceed in the same way on all the steps of the Test Case then move on to the next Test Case by clicking on the triangle to the left of this Test Case to unfold it and finally click on the Play button to the left of the 1st step of this new Test Case.
Once all the steps of all the Test Cases have been reviewed, you will have completed the test on this device. You can close this BugTrapp window and return to WAT to start another Device, if any remain to be tested.


